Rendering the Moana Island Scene Part 2: A production scene from a hobby renderer
October 11, 2018
Intro
Today I’m going to take a slightly different approach with this blog post. Rather than trying my best to overwhelm you with math equations we’re going to take a nice, casual stroll through my mind as I think about all of the changes I made to my hobby renderer to make it capable of rendering the Disney Moana Island scene. Think something like part post mortem and part recipe. If you’re really disappointed about the lack of math you don’t need to worry, I’ll get back to technical stuff in part 3.
Motivation
Before we get started let’s take a look at what my goal was. I wanted to be able to render the Disney Moana Island Scene on my desktop PC. While this is a fairly nice home machine with 32Gb of RAM and an 8 physical core CPU it is definitely not production server hardware with 100+ Gb of memory.
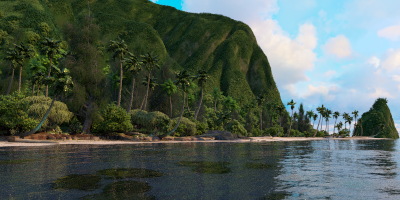
Here’s the holy grail shot of the scene rendered in Disney’s Hyperion renderer:
Scene rendered with the shotCam camera in Disney’s Hyperion
Beautiful! Makes me want to go watch Moana. There’s a small caveat on this shot in that it wasn’t rendered with the exact same content that Disney released. This was rendered with their original source and so it includes lighting, geometry, and material details that were later simplified to make this more manageable for us before being released.
To understand the differences between what the content looks like in Hyperion and what they released let’s take a look at two other renderers that have tackled this scene.
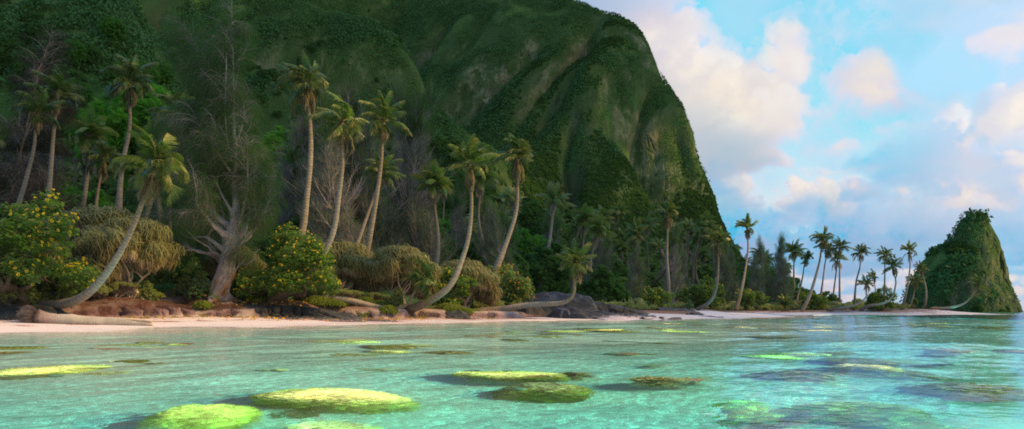
First up is the original PBRT render that Disney released with help from Matt Pharr:
Scene rendered with the shotCam camera in PBRT
You can see that the overall tone of the image is a bit different due to content simplifications as well as some lighting differences from the capabilities of PBRT. These are explained in the README.pdf that is included in the download. The surface under water is, like mine, too dark due to the failure of next event estimation to handle the occlusion by the water’s surface. This is also the one other renderer for which I have any numbers - it required 88Gb of memory to render that scene in PBRTv3. It’s worth noting that this was the first pass from PBRT and Matt Pharr has made some improvements that he wrote a very interesting series of blog posts on starting here: Swallowing the elephant (part 1).
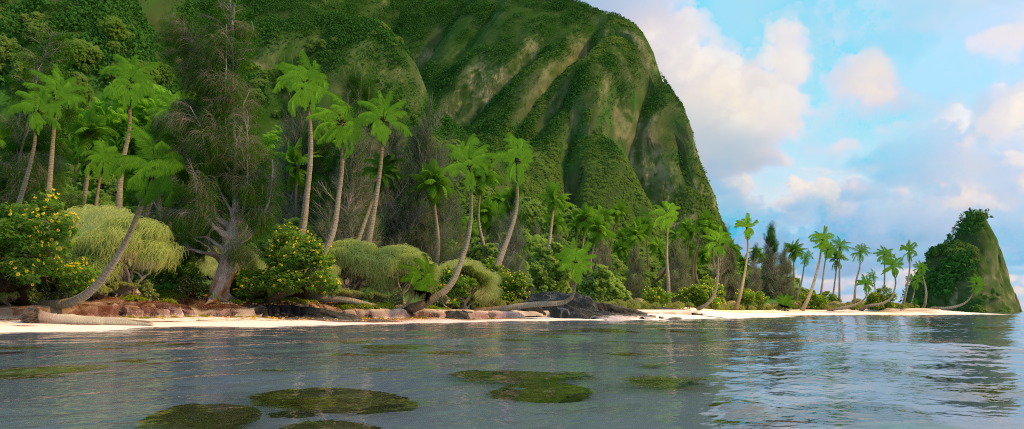
And next up we have a shot of the scene in Renderman thanks to Julian Fong:
Scene rendered with the shotCam camera in Pixar’s Renderman
This was rendered with version 1.0 of the content and so there are some additional differences. The main giveaway is the big Ironwood tree on the left having the wrong transform. If you see that in your scene head back to the source and download their updated version. It looks like they were able to avoid the issue with water occluding rays which looks better than the false occlusions but it lacks the caustics the Hyperion render has. I’m not sure about what technique they used to get this look. This image is a lot warmer and while some of that may come from content or how they handled the sky lighting it’s still interesting to see how different the results from the 3 renderers are.
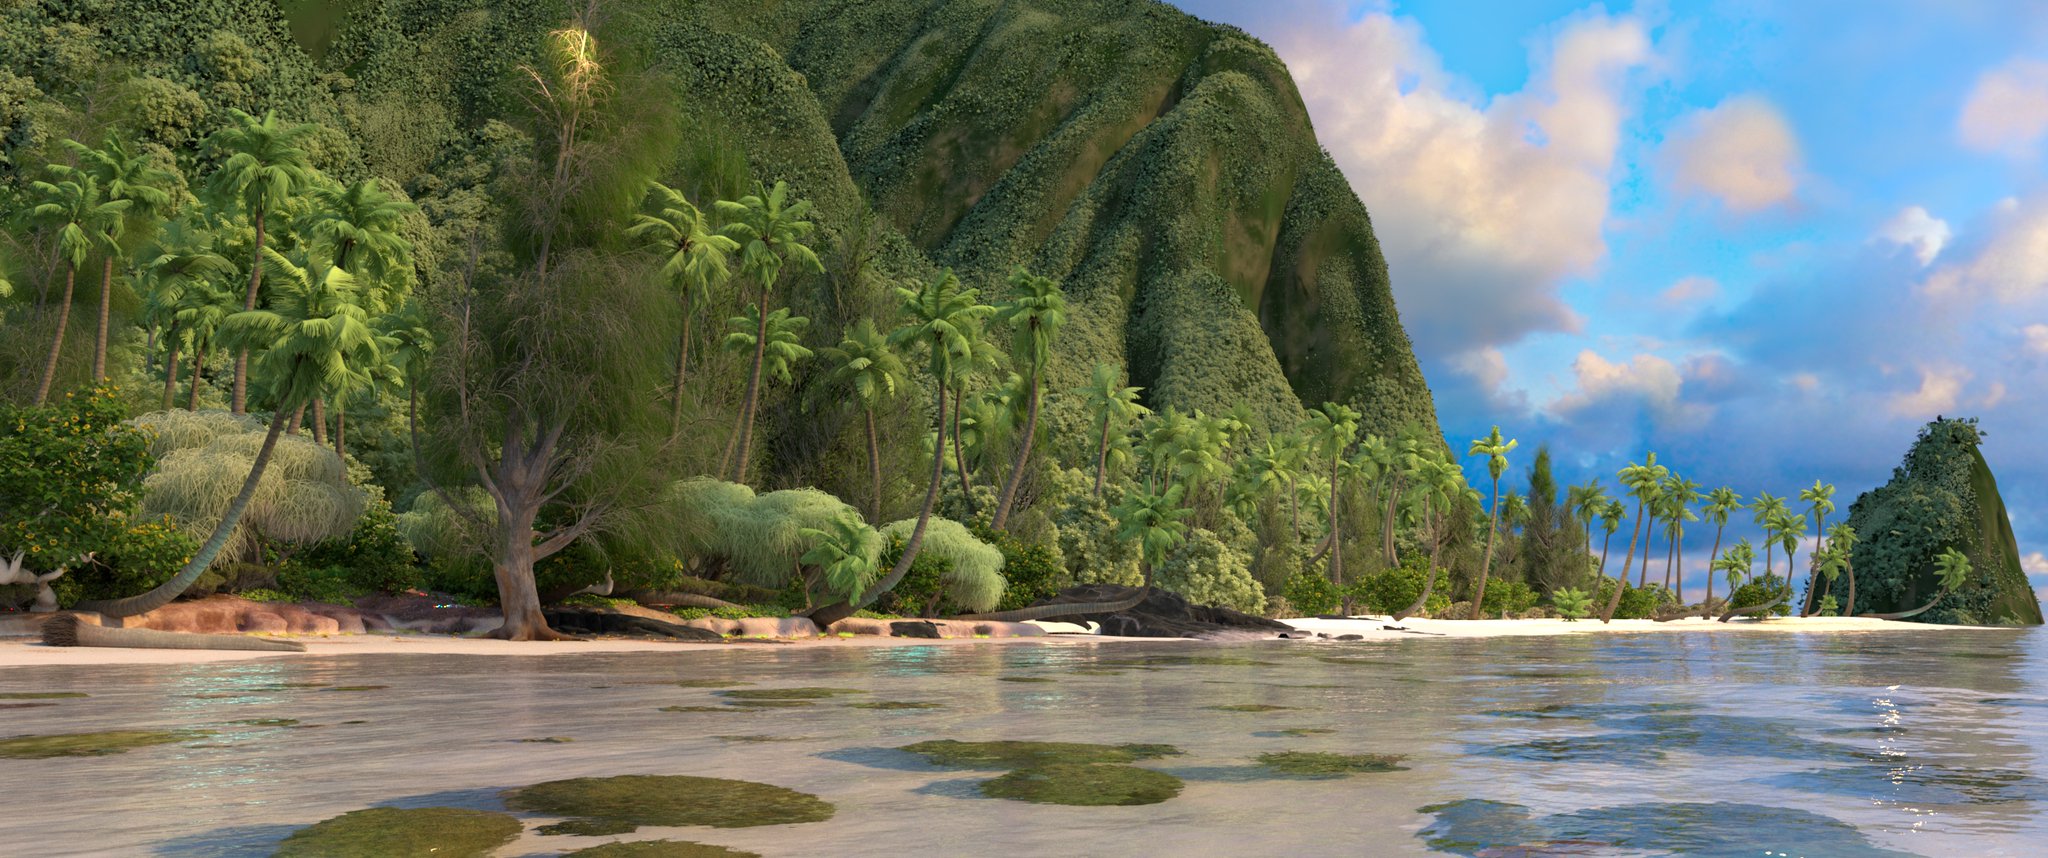
And what kind of programmer would I be if I didn’t introduce fourth option that is a bit different than the other three? Here’s the same shot from my hobby renderer:
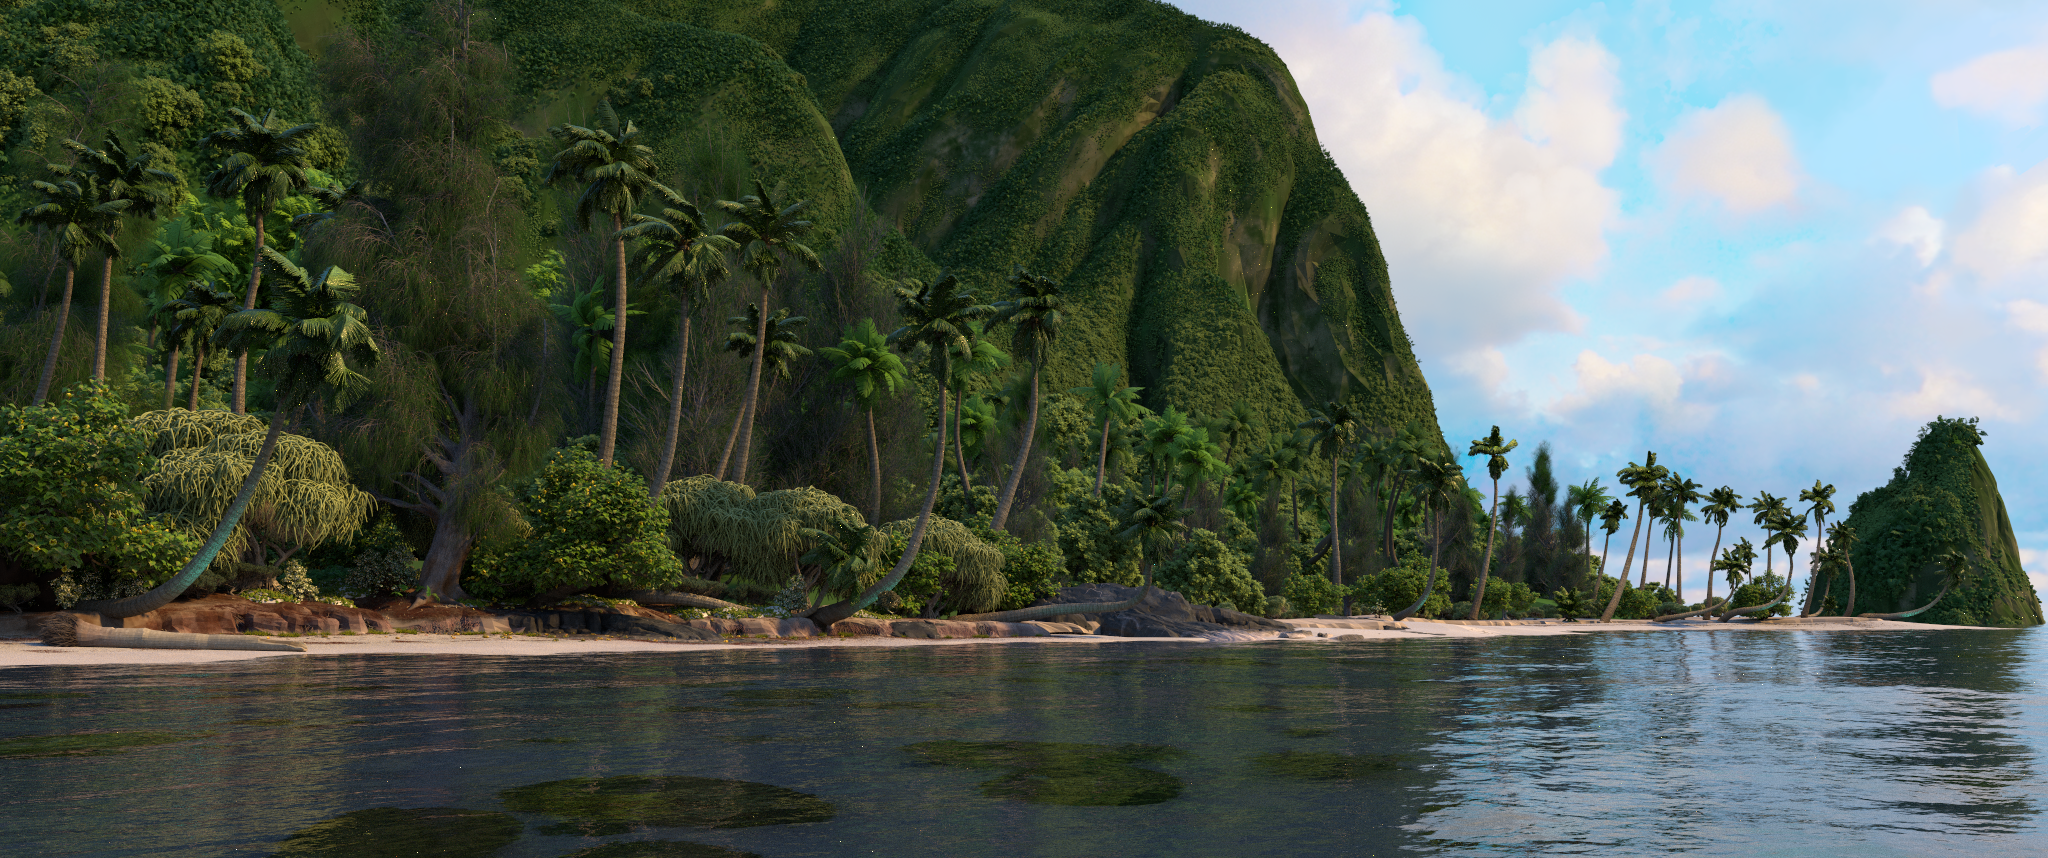
Scene rendered with the shotCam camera in my hobby renderer. You can click on it to see the full sized version.
This image was rendered at 2048x858 with 256spp and took 3.5 hours to render. I allowed it access to 28Gb of RAM but had to estimate how much embree would use for BVH data so it occasionally would exceed that number enough that the OS would start paging. While the render time isn’t something to write home about, I am quite happy that I was able to render it that quickly given the limited memory available. Let’s talk about how we got there…
Getting started
I’ll start by describing where I was starting from. Due to not being very challenged or interested in what I was doing at work I started working on a path tracer in February 2018. This was just a few weeks before the announcement of DXR so that was fortuitous timing for me. I decided to take a break from my hobby of rock climbing and dedicated the time to starting that code to see where it would lead me. This meant I was getting about 10 hours a week on the project so it hasn’t moved super quickly. While I can’t say I started entirely from scratch I really only had a few containers, math libraries, and some thread primitive wrappers from code I had written back in 2012. Some day I’ll write a quick post telling the surprisingly interesting story about the history of the code base that seeded this one.
Anyway, the tech available in my renderer when I started on the Island Scene was pretty much all stuff I had written about in the blog. While the geometry and IBL were loaded from content all of the other lights and materials were basically hard-coded into the engine. I had integrators for unidirectional path tracing with next event estimation and VCM but the threading models for both of these was very naive. It was really primitive. Heck, it’s probably still really primitive compared to a production renderer :P
The first step was to add support for their BSDF. That was a whole bunch of work to get what I’m going to say is “approximately correct” and I wrote all about it in part 1.
Importing the meshes
The next step to render the scene was to actually load the data. While not necessary at all, I already had plans to make a multi-threaded data build system so that’s where I started. This let me import the meshes in parallel and avoid re-doing work when the content hadn’t changed by serializing the data out to a binary format and tracking dependencies. With that in place and importing each of the meshes in parallel I could now try to import all of the meshes. Using the 4.1.0 release of the Asset Importer library this took about 8 hours to import most of the obj files. The osOcean mesh failed to export at all due to an error. Yikes! Thankfully, someone had already fixed the bug causing osOcean to error. Then after a bit of debugging I found it was only the gigantic Ironwood tree that took 8 hours to import because an array was constantly being resized while data was being added to it. Bet no one has ever seen that cause performance issues before -_-. Anyway, I wrote a quick fix for that and the folks that maintain Asset Importer were kind enough to accept my pull request so if you grab latest and build your own dlls you can import the Ironwood tree in about 2 minutes and the rest in far less time.
With all of that done I was able to import all of the data from scratch in about 15 seconds. Most of that time is spent parsing the curve data files which I didn’t take a great approach to but am not bothered enough by to improve. Part of that is because when no content has changed my renderer will begin work in less than a second of starting the app. There’s a bit of cheating here that I’ll explain later.
Multi-level Instancing
Now that I can import the meshes in a reasonable amount of time the next step is to attempt to construct the whole scene. If you take a close look at their element .json files you will see that each element can be composed of potentially tens of thousands or hundreds of thousands of instances and each element can also be instanced. To ground that, think of a tree with thousands of instanced leaves with there being about a dozen copies of the tree visible on the island.
Given the size of the data I’m trying to load and the memory I have available using hierarchical instancing here is the obvious choice. Embree has some support for these via their user-geometry primitives. These allow you to define an axis-aligned box that, when a ray would enter the box, will issue a custom callback in which you can then transform the ray to local space of that instance and forward it to a child scene. While the capability here is very nice the limit of axis-aligned boxes for the top-level shape is not great. Using convex hulls for the bounding shape would be nice and likely reduce the number of these callbacks substantially.
Anyway, that’s good enough to get it working. Once support for multi-level instancing had been added I can now render all of the geometry. Let’s throw it all at my renderer and see what happens:

This is a significantly dramatized re-enactment of what actually happened. The reality is that the raw geometry and the BVH data exceeded what the OS would allow me to allocate and the app crashed before it could even start rendering. Then I put my computer to sleep, went to play ultimate Frisbee, and came back to a PC that wouldn’t start thanks to a dead motherboard. So yeah… definitely an explosion while rendering :P
After over a week without a working PC I got back to work. While I couldn’t render everything I was able to cherry-pick a handful of elements and rendered a part of the scene without crashing.

Geometry caching
One really awesome side effect of the way multi-level instancing is handled by embree is that I can pretty trivially introduce geometry caching inside of the user-geometry callbacks. The contents of each element file were split into separate “subscene” files and in the user-geometry callback I added a lock-free way to verify the data was loaded before forwarding the ray to the subscene. If it wasn’t loaded the approximate least recently used subscene would be evicted until enough space was available to load the subscene.
Earlier I mentioned that my renderer began work within one second of starting the app and I said that was kind of cheating. This feature is where that “cheating” is coming from. The renderer only needs to initialize the BVH for the top-level scene before the renderer gets started and the rest of the loading and BVH initialization is done during the render. If I were to load, construct the BVH, and unload all of the subscenes in a serial fashion it’d take about 15 seconds with the vast majority of that being in BVH initialization. While embree is super fast here I do wonder how much time I’d save if I could construct the bottom-level BVH’s in my build pipeline and simply attach to the data.
After some testing in smaller scenes to verify my tech is working correctly I then tried to render all of the geometry at once. It did not go well. It did not go well at all. After 20 minutes I checked the progress and found that it had completed a few hundred paths. I decided that the environmental impact of completing the render was not worth it and canceled it there.
The task I have been wanting to try for years
The cause of this slowness shouldn’t be too surprising to anyone. Path tracing leads to rays that are highly incoherent which means that a random subscene will often be loaded for just one stray ray and then unloaded before any other rays come along to hit it. During that 20 minute attempt at a render the CPU was mostly just chilling while the poor hard drive was channeling its inner Sisyphus. And so this gives me an excuse to finally implement something I’ve been exciting about doing for years. Seriously, this might be the first paper I ever tweeted about. Sorted Deferred Shading for Production Path Tracing is a paper from Disney describing the details of how they bin and sort each ray based on origin and direction and each hit based on geometry and primitive id. The extra work added by the binning and sorting process is paid for by a drastic reduction in the amount of data that the render needs to load off disc which leads to a massive performance improvement for out-of-core rendering.
I’ll skip the details of my implementation here. The only real difference between what they describe in the paper and what I did is that I added a second set of ray bins for occlusion rays whereas Disney traditionally only had one ray type. Some of their more recent presentations suggest wanting to add support for occlusion rays so I just threw them in from the beginning. Perhaps profiling will change my mind later?
Ptex
With that change done the renderer is now capable of handling all of the geometry but still can’t render the scene correctly due its lack of support for Ptex. Fortunately, this was a super straightforward library to implement. Create a PtexCache and have the shading threads fetch the textures they need from it. Because the hit positions are sorted the cache will be doing fairly coherent reads so it “just works”. The one thing to mention is that if you are doing this on a Windows machine make sure you build bins from latest to get a bugfix. Otherwise your render might take… forever.
The one other caveat to mention here is to make sure the mesh importer you’re using is not modifying the input meshes at all. Ptex depends on those texture ids matching and in order to pair meshes to their textures you’ll need to make sure your importer hasn’t merged meshes using the same material together.
And that’s it! With geometry caching, sorted-deferrer path tracing, and support for ptex my renderer can now handle rendering the island scene. Now seems like a good time to throw in a shot from my second favorite camera from the data set.
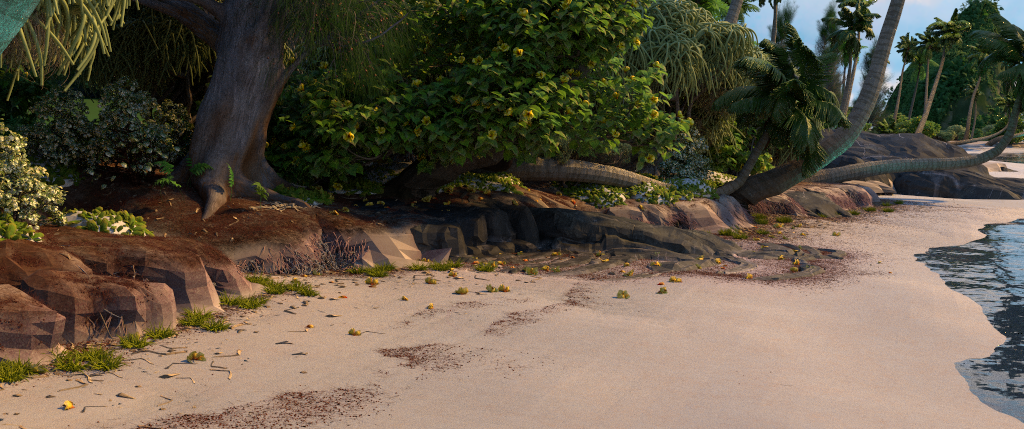
beachCam shot rendered at 1024x429 with 256spp in 1 hour and 20 minutes. My lack of robust support for subdivision surfaces explains the weird beach geometry.
Misc
There are a few other small things worth mentioning that might save you some time. I’ll quickly enumerate them all here:
- Disney uses light sets to allow them to place lights that only apply to specific meshes in the scene. I split the lights.json file into 3 such that the IBL and the main sky light where in one, all of the palm lights were in another and the beach light was in a third. I then associated each element with a number of these sets. By restricting the lights this way I avoid having awkwardly visible streaks of light on the ocean.
- When you’re parsing the element files and you find an empty instancedPrimitivesJson entry in the instancedCopies section just ignore it rather than doing that usual behavior of overriding the instancedPrimitives. Doing an override in this case caused the leaves on all but one of the isPanderus trees to disappear. I’ve seen at least one other tweet with a screenshot containing the same bug so I know I’m not the only one to run in to this.
- The scale of the scene exposed a precision issue in my code to generate primary camera rays. If you’re seeing geometry aliasing at even moderate sample counts make sure you’re not also running into this problem. This became apparent to me when I implemented Pixar’s Correlated multi-jittered sampling and the aliasing wasn’t noticeably reduced.
Next steps
The next thing for me to do is profile. 3.5 hours on that machine at that resolution and with that sample count is good but there’s gotta be something dumb I’m doing that a quick fix for could make it even faster. I’m kind of scared of seeing the stats for how many times I’m loading a subscene right now only to have the ray miss everything in it. Expect a section in part 3 of this series where I discuss some findings.
After that I want to do something about the geometry under the water being too dark. Disney describes using photon mapping with a kind of primary sample space learning to get their caustics. I could also look into Manifold Next Event Estimation. Whatever I settle on will be the main subject of the third and final part of this series.
Conclusion
This was fun! It was definitely a non-trivial amount of work. While one person can clearly make a path tracer in a weekend (and thanks to Peter Shirley a lot of people have) it’s really clear that it takes a whole team of talented developers to make a production renderer. That’s not even including all of the work that went into the tools Disney’s artists used to create this scene. Hopefully with this blog post I’m able to make it simpler for someone to get this scene rendering on their available hardware.
Finally, it should go without saying that Disney is awesome for putting the work into releasing this. Thank you again, Disney!
References:
- Disney’s Moana Island Scene
- Swalling the Elephant by Matt Pharr
- Sorted Deferred Shading for Production Path Tracing
- Correlated multi-jittered sampling
- Manifold Next Event Estimation
- The Design and Evolution of Disney’s Hyperion Renderer
Additional Thanks: